When it comes to web browsers, Internet Explorer, Firefox, Opera, Safari, and Google’s Chrome get all the attention. But they’re not the only web browsers on the market, nor are they necessarily the best.
While you’ve probably never heard of Flock, K-Meleon, and Maxthon, these three alternative browsers offer features so innovative that once you try them out, you just might feel compelled to add them to your permanent stable of web browsing tools. Find out why….
FLOCK
Flock bills itself as “the social web browser” and it has more hooks with popular web technologies than any other browser. With Flock’s “Accounts and Services” sidebar, for instance, you can aggregate and communicate with your friends from most of the popular social networking sites while you surf other sites. With the Photo Upload feature, you can either drag photos from your computer or select multiple images from a folder, and Flock will resize them and send them on to Picasa, Photobucket, or TinyPic.
If you have a blog you can add blog entries directly from Flock using the browser’s built-in Blog Editor.
Add links in the side panel to Gmail, Yahoo Mail, and instant messaging in the same Accounts and Services sidebar, and Flock gives you nearly instant access to most of what you’re likely to be doing online today. Log on to a site that offers content or RSS feeds, for instance, and Flock will alert you to their presence, instructing you how to use the orange feed button to add the site to your list of feeds. Flock feels as fast and stable as IE or Firefox. IE users, in particular, will be able to adopt Flock with virtually no retraining, since most of the keyboard shortcuts – including those to access Favourites are identical.
If what you want in a web browser is speed, along with a healthy dose of customizability, then K-Meleon will be worth your time. This little-known browser was launched specifically to be easy on system resources and therefore speedy where other browsers are not.
Even during installation, K-Meleon gives you the option of installing a pre-loader that promises to increase browser load times by keeping a portion of the browser’s code in memory at all times. Even without benchmarks, complex pages load noticeably faster than with either IE or Firefox, as both graphics and text appear almost simultaneously. Keyboard shortcuts and menus resemble those in Firefox.
A handy sessions menu allow you to save multiple browser tabs to one shortcut, meaning that if you regularly have 10 web sites open, you can reopen them all with one click. K-Meleon allows you to set up multiple user profiles so that each person who uses a computer can have a unique browser set up.
There are the usual browser-specific options that are accompanied by a host of advanced configuration settings, mouse accelerators, bookmark options, and view settings.
Originally developed in China, Maxthon is different in some immediately noticeable ways, including its interface, which is bereft of the standard title bar, giving you more browser space in which to view web pages. Virtually everything about the interface can be customized. In this “no interface” mode, Maxthon is more Spartan even than Google’s Chrome. The effect makes Maxthon a notable solution for viewing web pages on small notebook screens.
Virtually every feature in the browser is accessible with the keyboard. You can even assign the function keys on your keyboard to open specific web pages, and you can create “web aliases,” which allow you to open a web site or groups of sites merely by typing a few letters or a word into the address bar. A unique Groups menu makes short work of saving a set of open tabs to a single shortcut. The browser also comes with some useful tools, including a full-featured form-filler, a flexible screen capture utility, a “file sniffer” that can help you find the web addresses of videos and a “collector” or notepad feature that can save your thoughts from session to session.
There’s a complete skinning system as well, which allows you to change the look and feel of the browser. Add it all up, and you have a browser that should have the major players taking notice.
It is an ultimate Hair Stylist application for you, with over 100 hairstyles, unlimited number of hair colors, ability to add any photo available on your pocket PC. Go ahead and surprise yourself. it features more than 100 hairstyles from short, medium, long, fancy and men. You can add moustaches for a perfect gentleman fit. Default comes with 12 color palates. You can insert your own photos.
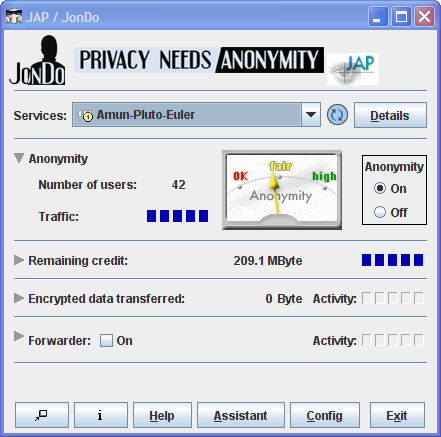
JAP makes it possible to surf the Internet anonymously and unobservably. Without Anonymization, every computer in the internet communicates using a traceable Address. That means the website visited, the Internet service provider (ISP), and any eavesdropper on the internet connection can determine which websites the user of a specific computer visits. Even the information which the user calls up can be intercepted and seen if encryption is not used. JAP uses a single static address which is shared by many JAP users. That way neither the visited website, nor an eavesdropper can determine which user visited which website.
How it works
Instead of connecting directly to a webserver, users take a detour, connecting with encryption through several intermediaries, so-called Mixes. JAP uses a predetermined sequence for the mixes. Such a sequence of linked mixes is called a Mix Cascade. Users can choose between different mix cascades.
Since many users use these intermediaries at the same time, the internet connection of any one single user is hidden among the connections of all the other users. No one, not anyone from outside, not any of the other users, not even the provider of the intermediary service can determine which connection belongs to which user. A relationship between a connection and its user could only be determined if all intermediaries worked together to sabotage the anonymization. more...
The intermediaries (mix providers) are generally provided by independent institutions which officially declare, that they do not keep connection log files or exchange such data with other mix providers. JAP shows the identity and number of organisations in each Mix cascade in detail, and verifies this information by cryptographic means. The users are thus able to selectively choose trustable mix cascades.
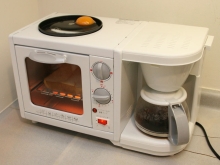
Bread toaster, coffee maker and hot plate, all in the "Wake Up Morning Set"
As we all know only very well, Japan is one of the most technologically advanced countries in this world, the number of innovative products launched on the market by Japanese companies every year being absolutely huge. And we're not talking here just about computers, gaming consoles, TVs, digital cameras etc., but also about everyday products for home use. And one of the most interesting devices made in Japan I've come across lately is the so called "Wake Up Morning Set", a very useful multi-functional device that combines an electric grill, a bread toaster and an automatic coffee maker machine.
As you can plainly see, this device is aimed at creating the perfect American breakfast. One can use the electric grill to make some bacon and eggs (or whatever else he/she might desire, for that matter), the toaster to make some toast bread (or heat up some leftovers from yesterday's diner, if you're in a hurry), all of these while waiting for that perfect cup of coffee that jump-starts you in the morning. Moreover, this device carries out its breakfast making duties quite rapidly, since the fried eggs are ready in around 10-12 minutes, the toast in 3-5 minutes, while the coffee is ready in around 2 minutes.
Another interesting thing about the "Wake Up Morning Set" is its control system. Thus, the user can either start all the functions at the same time, or use them separately, according to his/her personal needs, thus making it a very interesting addition to one's army of kitchen appliances. However, the device does have a problem, namely it consumes a huge amount of power (around 1,140W) when all 3 functions are switched on. Not sure about the availability, but - according to the Japanese site Impress Watch - it won't be too expensive, just around 40 US dollars, which makes it quite affordable for all the people who don't want to waste too much time preparing their breakfast in the morning.
Files in the new Office formats often cause problems when they are opened with older versions of the software. Yet not many prefer to buy the new Office package just to work in an “upwardly compatible” way.
You need not buy the new Office package. Microsoft has released the “Compatibility Pack” solely for this purpose. You can download it form the Microsoft Download Center. Please ensure that you have the latest versions of Office XP and 2003 and that all important updates have been installed before you install the tool.
To install the “Compatibility Pack”, start Windows Update or open the link “http://www.microsoft.com/downloads/thankyou.aspx?familyld=941b3470-3ae9-4aee-8f43-c6bb74cd1466&displayLang=en” in the browser and install the available updates. Then, open the “FileFormatConverters.exe” file and finish the installation process.
To accelerate your computer, regularly defragment the contents of the system hard disk. However, during the defragment process, important elements such as the swap file are skipped, resulting in the slowing down of the computer.
Windows and the current defragmenters cannot access the files which have been exclusively opened by the system. Therefore, the registry data and the swap file are usually ignored during the optimization. However, these files are used frequently and they take up a large amount of space. Therefore, their fragmenting slows down the system significantly. But then again, there are specialists to solve every problem!!! The tool “Pagedefrag” uses the start phase of the PCs to defragment the registry and sway file. During the start phase, Windows can access them.
After unpacking the zip archive, the tool can be readied for use by just calling “pagedefrag.exe” without any further installation processes. It first shows how many clusters occupy the respective system files and how “fragmented” they are. Besides the swap file, and the branches of the Registry, the tool also processes event protocols as well as the stand-by mode file. Its size corresponds to the quantity of the installed main memory.
APPLICATION: For one time execution, select the option “Defragment at next boot” and click on “OK”. Then, restart the computer. While booting, the tool completes its task and creates a status report. You can check the progress by calling Pagedefrag in Windows again and checking the actual status in the Pagedefrag dialog box. This kind of defragmentation must be repeated from time to time. You will be rewarded with remarkably shorter booting and shut down times for your computer.
AUTOMATION: To automate the process, select the option “Defrag abort countdown” to “0”, and confirm with “OK”. In future, “pagedefrag” checks the status every time the system starts and then optimizes the files if required. The check takes just under a second.
If you do not wish to run the check on every boot, you can also automate the execution with the Task Planner. Use command “pagedefrag –o –t 0” in the command prompt for that. It is used for one-time defragmentation on booting the next time.
While starting the disk cleaner, the tool analyzes the amount of space that can be freed by compressing old files first, before it allows access to options. This is time consuming. While doing so, you don’t have to use the packing function at all.
The time-consuming analysis can be permanently stopped by an intervention in the Registry. Start the Registry Editor and browse to the “HKEY_LOCAL_MACHINE\SOFTWARE\Microsoft\Windows\CurrentVersion\Explorer\VolumeCaches” key. Select the sub-key “Compress old files” and create an REG file through “File->Export” as a backup copy to restore. Then, delete the entire entry. After restarting the system, there is no more analysis so that you can reach the settings of the data carrier cleaning faster. Besides, the option “Compress old files” no longer exists in the dialog. If you want to undo the change, execute the created REG file by double-clicking on it and confirm the acceptance of the values in the Registry by clicking on “Yes”.
A prime consideration when buying a projector is the brightness, which mainly depends on the lamp used. I have used a simple data projector from Liesegang (OHP 2510), equipped with a 400 W halogen lamp, which, according to the datasheet, produces 3,500 ANSI lumens to demonstrate. The top-of-the-line models feature HQI lamps of 600 W and even more.
As most of the energy is given off as heat loss, operating a projector means the surroundings become heated. Most importantly, the LCD panelmust be sufficiently cooled to prevent any damage!!!
My recommendation when all's said and done: for good illumination and adequate brightness, your projector should have at least a 350 W lamp. At low brightness, the room has to be effectively darkened to achieve a good picture on the screen's large dimensions.
TFT Display: Resolution, Color Intensity, Response Time
Comparison of various displays:
The table above lists the principal resolutions; note that resolutions higher than SXGA are seldom available in 15-inch format, with the exception of some notebook displays. This means the display no longer fits the overhead projector, as its dimensions exceed the light frame. The panel on our projector was taken from an older flatscreen from Iiyama, the 15.1" BX3814UT.
Several factors must be taken into account to avoid destroying any components.
I don't really need to mention color accuracy, as almost all older displays support 24-bit color depth, and hence 16.7 million colors for perfect DVD screenings. Response time poses no problems, even on relatively small displays up to 15 inches: less than 30 ms average is completely adequate for perfect picture reproduction.
Step by Step: Removing the TFT Panel
The difficulty of removing the LCD panel depends on the flatscreen you choose; it may prove easy or, in a few cases, nearly impossible. In our experience, the displays from Iiyama, such as our BX3814UT, make an excellent choice, because the LCD panel is adhered to the frame only lightly, and can be removed with just a little bit of care. Not all manufacturers follow this approach, and this raises the risk of breaking the panel during removal.
We must first take off the stand before disassembling the rest of the unit, ending with the entire casing. Start by removing the metal panels.
Rear view of the flat screen. The screws for the stand are removed first, then those for the casing.
Before the next step, we advise you to pull all the cables, so the inverter board and its panel can be removed. You might want to label all the connectors to make reconnecting easier later on. Removing the panel from the frame is a little trickier, as a hairline crack can quickly appear and destroy the conductor paths. LCD panels are glass with fine conductor paths vapor-deposited onto them, and the connections to the controller are made on the margins. All paths are very thin and extremely sensitive to tensile stress. A broken conductor path can lead to missing screen lines or to total destruction of the unit.
Be extremely careful: these miniature connections cannot be repaired!
The LCD panel is still on in this picture, but all cable connections from the controller and inverter have already been removed. The most sensitive work is in removing the panel from the plastic frame without breaking the display.
Done-the LCD panel removed from the frame.
Important: the inverter board contains the control logic and the high-voltage unit for backlighting.
Most TFT monitors contain a second board holding the VGA input and the power socket.
Assembly: The Projector's LCD Panel
After carefully removing the LCD panel, you can now start putting the actual projector together.
Even during the initial test phases, the display must be firmly positioned where it can't slip. Furthermore, the panel may not be laid directly on the projector pane, as it will quickly get damaged by heat from the lamp. A thin strip of wood or plastic is good as a spacer; a height of 8 to 10 mm (about 3/8") is more than enough. I’ve used polystyrene of the sort frequently found in packaging; these strips can also be adjusted with adhesive tape. The following pictures illustrate what you have to do.
...and the first test installation of the LCD panel!!!
The necessary gap between the pane and the LCD panel can be clearly seen here.
Connecting the leads to the controller: mount with adhesive tape.
Once the panel and spacers have been successfully mounted, cables can be connected to the controller and inverter. This step requires the utmost care: the contacts on the flat cable are separated by tenths of millimeters, and the slightest tilt will cause a short circuit.
A view of the mounted LCD panel and flat cable.
Very Important: Permanent Cooling For the LCD Panel
Because of the incredibly high power consumption of the lamp (400 W), our homemade projector needs sufficient cooling -- the integrated fan in the Liesegang projector just doesn't cut the mustard. Heat build-up occurs especially between the projector's LCD panel and glass top, due to thermal conduction from the lamp that can only be prevented by permanent air circulation.
The initial sign of the display overheating is a brown ring that appears in the area that gets too hot, which shrinks again when the unit is cooled. If the heat level is not reduced relatively quickly, this is followed by failures in the corresponding areas. The display becomes permanently burnt out if repeatedly overheated, and will no longer display in the damaged area.
For the test construction, I fitted various fan types in a number of positions. The result: all you need is a single 8 cm fan that creates airflow under the LCD panel. An additional power supply for this can be created using a standard ATX power unit. An office fan set at the lowest speed is also an option.
This fan does the job: permanent air circulation between the LCD panel and glass top
Only for testing and adjustment: the 8 cm fan taped in place.
The nearly completed project.
The Liesegang projector with installed LCD panel and leads. And we're off!
The fan running at full tilt, powered by an external ATX adapter. Other solutions are also possible.
Made It: The Homemade Projector, Up And Running!
After about six hours' time assembling and tinkering, our homemade projector is ready to go. The following pictures should give you an impression of what the ambitious user can expect.
The LCD panel works - now the input source can be connected.
Fine-Tuning: Adjusting The Graphics Card And LCD Panel
Once all the components work together properly, all you have to do is adjust the LCD panel and graphics card to get the best picture. In practice, this means tweaking contrast and brightness. Only a few TFT monitors are set out of the box for maximum possible luminous efficiency, so subsequent fine-tuning can enhance both color and contrast enormously. In our case, adjusting brightness and contrast led to a much better display, enabling us to run the projector even in a sunlit room.
Conclusion: The Fun And Fascination Of Building Your Own Projector
The result was all the more pleasing: the projector we built convinced even the notorious skeptics at the THG lab in Munich. Despite daylight flooding the room, the luminous efficiency of 3,500 ANSI lumens made it possible to screen DVD films and images onto a white wall. Perfect display quality can be achieved in a completely darkened room.
The homemade projector is great fun and provides great detail, as a result of its XGA resolution. But it's not just the money you can save that will motivate many users to action - it's the fascination of building, and the ability to select components for optimal picture quality. In our case, the overhead projector (Liesegang OHP 2510) and LCD panel from Iiyama cost just $250. And they don't have to be new devices. Used or cast-off 14" and 15" TFT monitors are widespread nowadays. A good one shouldn't cost more than $150, and the price for a model with non-functioning backlighting will be even lower. Projectors can be picked up at auctions for around $50.
Adding in the cost of small parts such as a fan and tape, you are still well under $300.
Considering the result, that's a great deal, especially when you compare the resulting picture quality to a cheapo projector costing at least $500 yet having only SVGA resolution. Another benefit of the homemade projector lies in its use of reasonably-priced halogen lamps (a 400W lamp costs about $30), compared to commercial models using $200 lamps.
What about the downside? Well, the appearance, characterized by a more-or-less chunky projector with a display on top, would certainly not win any design prizes. Also, the LCD panel must be adequately cooled if severe damage is to be avoided. In this context, an annoyingly loud noise may accompany operation. But this is also a well-known problem with low-end projectors.
Nothing to do over the holidays? Why waste time on facebook? How about spending a few free days building your own projector? It's certainly a worthy project!
THANKS TO “Tom's Hardware Guide PCs & How To: Supersize Your TV for $300: Build Your Own XGA Projector!”